Tips and tricks
Creating a bot based on screen pixels can sometimes feel a bit hacky. Defining actions that are both reliable and efficient is not always straightforward: small visual variations, noisy backgrounds, or performance constraints can easily lead to instability. In addition, it is often impossible to test an action against every possible visual situation.
This section gathers practical tips and tricks drawn from real use cases. They illustrate common problems encountered when interacting with graphical user interfaces and show how guirecognizer can be used to mitigate them with simple but effective strategies.
Noisy background color
One action available in guirecognizer is to get the color of a pixel on screen. It can be used to assess whether something is present or not on screen. When the background is noisy, this strategy can still work by computing the average color over a screen area.
Let’s take the following image as an example. It comes from the bot example for the game Cookie Clicker.
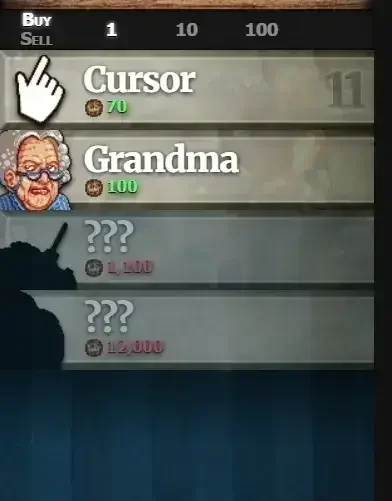
Example of a noisy background. The colors for the highlighted game element are not uniform.
Here are two pixel colors for the highlighted game element. The lightness varies from 16% to 40%.
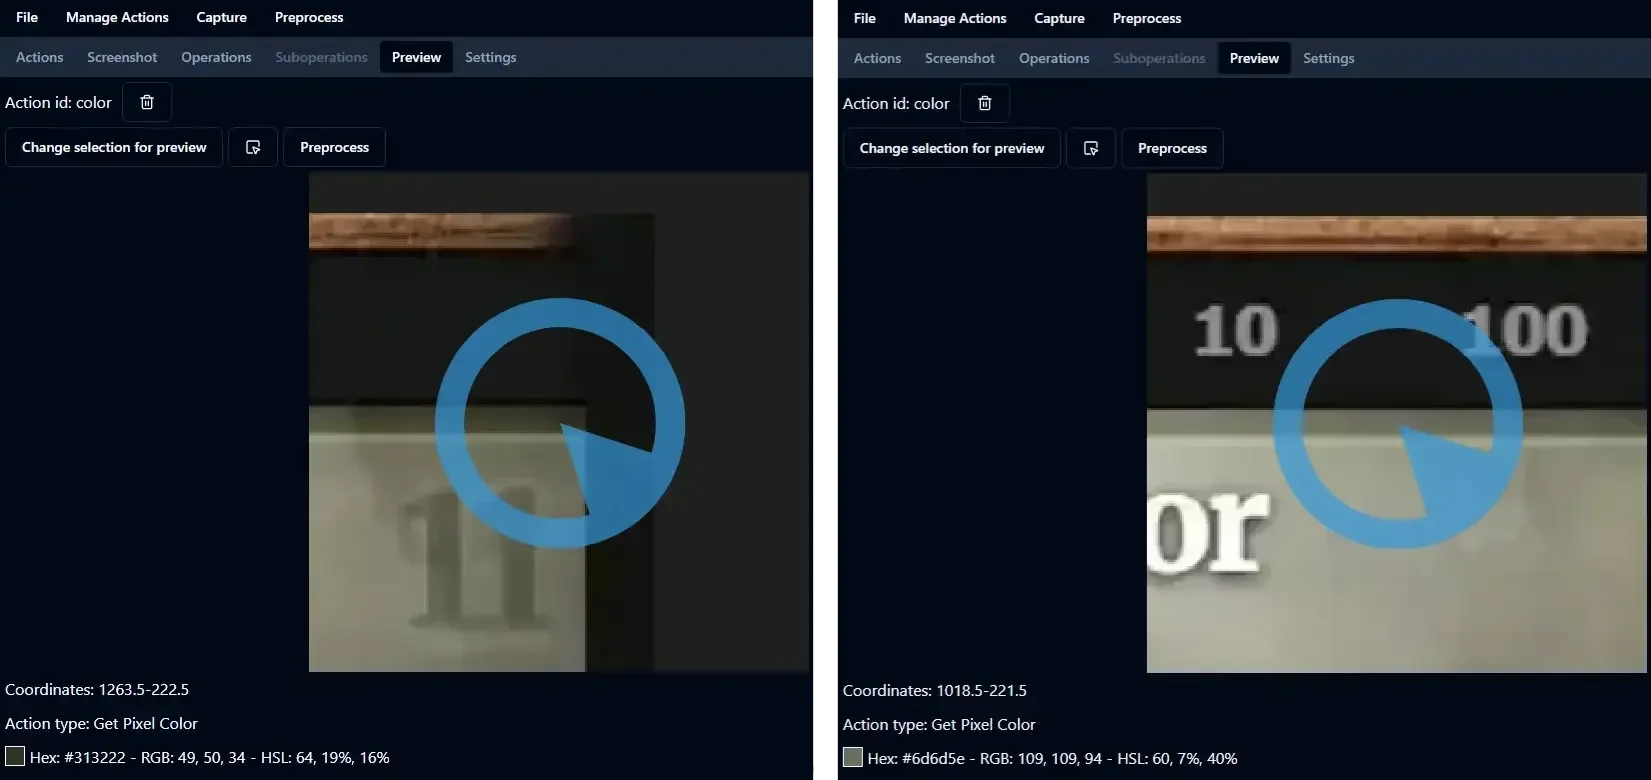
Two pixel colors of the highlighted game element. The range of lightness is a bit wide.
Here are two pixel colors for the non-highlighted game element. The lightness varies from 15% to 35%. It overlaps with the range of lightness of the highlighted game element.
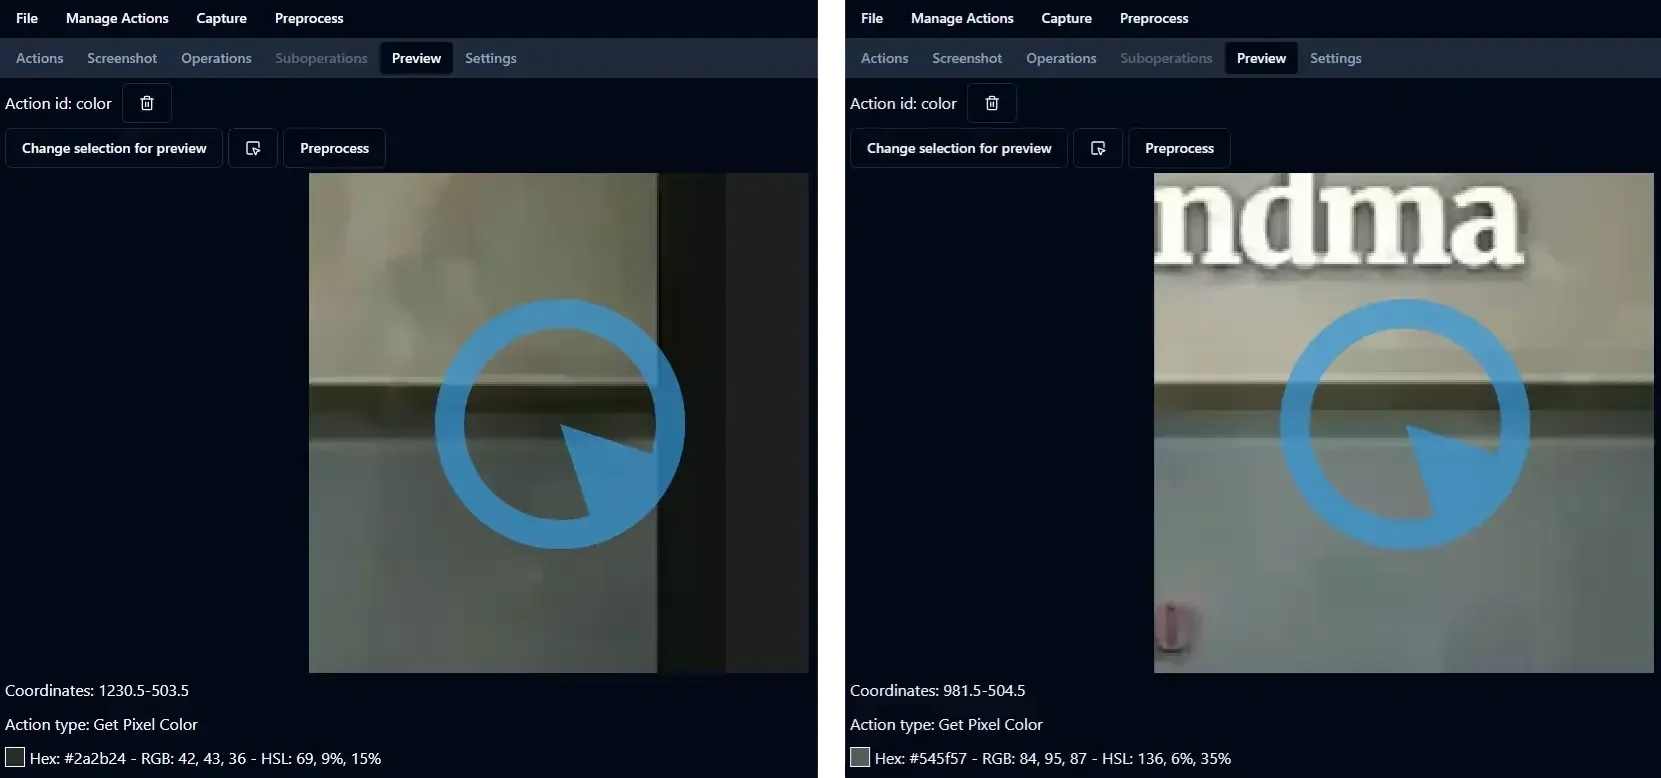
Two pixel colors of the non-highlighted game element. The range of lightness overlaps with the previous one.
When using the average color of a screen area, we have a more stable color which can be used in comparison to know whether the game element is highlighted or not.
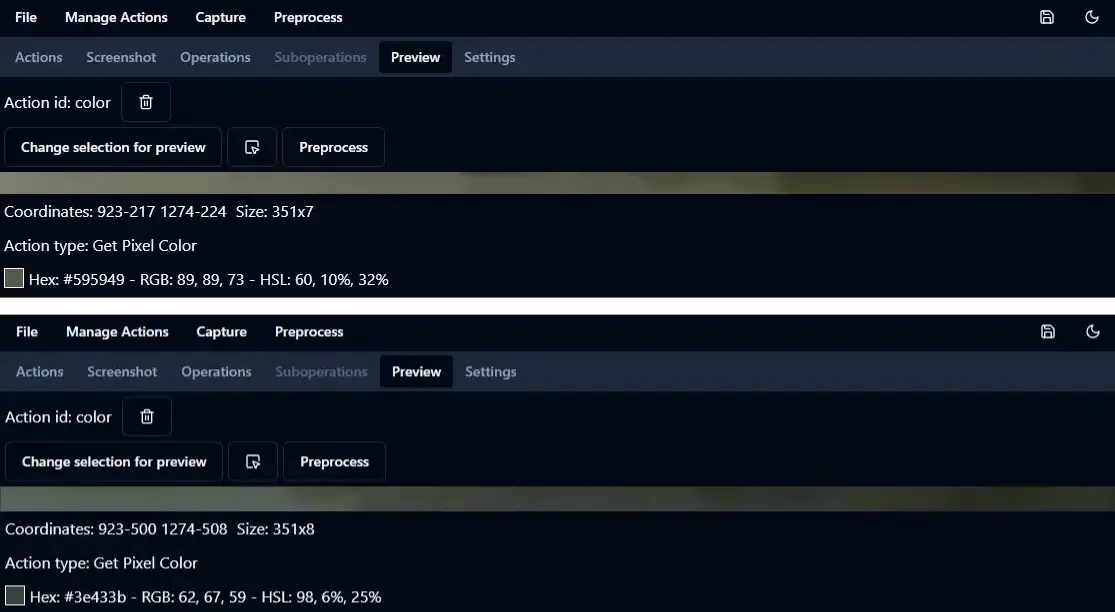
The average color over a screen area for both highlighted and non-highlighted elements.
Identify grid content
It’s quite common to have a grid of elements and we want to identify the content of the grid. Even though creating a new action with guirecognizerapp is easy, it would be cumbersome to create an action for each square of the grid. Instead, the idea is to use two actions to mark the coordinates of the extremities of the grid. From these two reference points, all grid cell positions can be computed programmatically.
Let’s take the example of the game 2048.
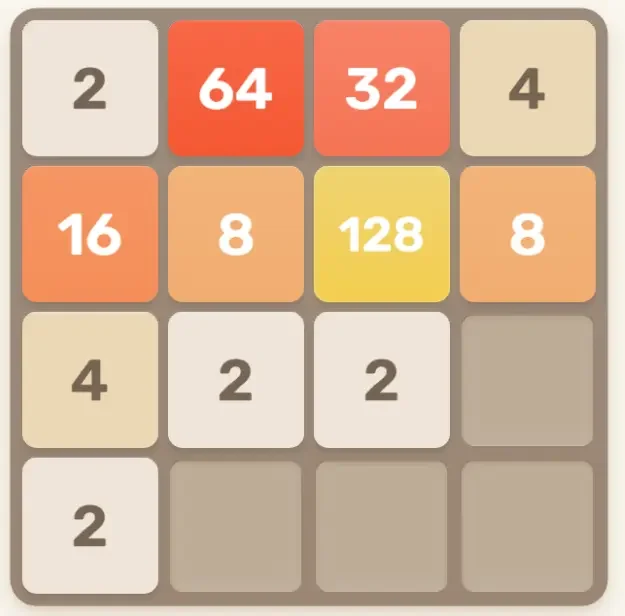
Example of a grid from the game 2048.
Open the game in your browser at https://play2048.co then take a screenshot in guirecognizerapp. Define the borders as the grid or the whole screenshot. Save the file 2048Config.json in your project folder: File -> Save or Ctrl+S.
Create a Get Coordinates action: Manage Actions -> Add Action Get Coordinates. Name it topLeft. Select a pixel in the top left part of the top left square. The selected pixel should point to the background color and not the number inside the square, for any number possible.
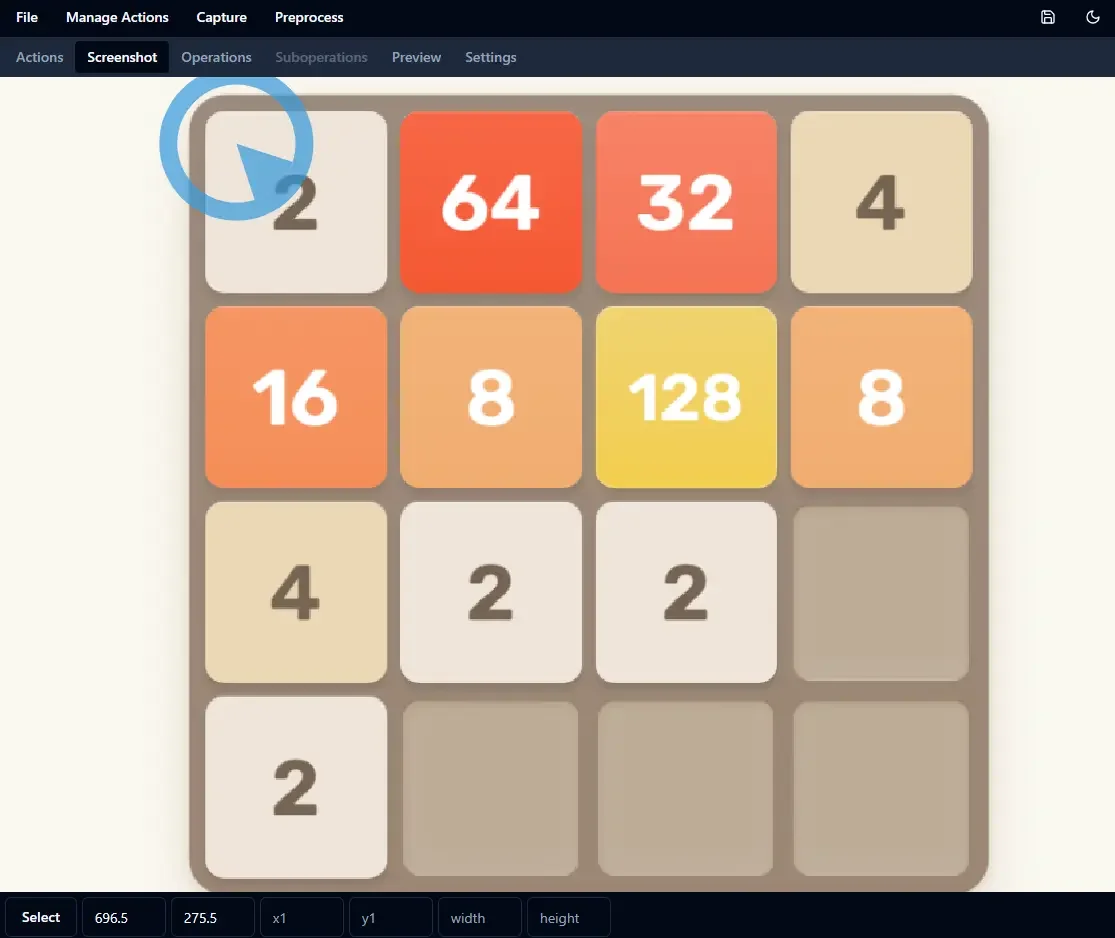
Selection of action topLeft.
Create another Get Coordinates action for the bottom right square. Name it bottomRight. Select a pixel in the top left part of the bottom right square.

Selection of action bottomRight.
We can now loop through all the squares of the grid and retrieve the background color of each square.
 1 from guirecognizer import ActionType, Recognizer
 2
 3 recognizer = Recognizer('2048Config.json')
 4 topLeft = recognizer.executeCoordinates('topLeft')
 5 bottomRight = recognizer.executeCoordinates('bottomRight')
 6 gridWidth = 4
 7 gridHeight = 4
 8 width = (bottomRight[0] - topLeft[0]) / (gridWidth - 1)
 9 height = (bottomRight[1] - topLeft[1]) / (gridHeight - 1)
10
11 for y in range(gridHeight):
12 line = ''
13 for x in range(gridWidth):
14  coord = (round(topLeft[0] + x  * width), round(topLeft[1] + y  * height))
15  color = recognizer.executePixelColor(ActionType.PIXEL_COLOR, coord=coord)
16  line += f'{color} '
17 print(line)
(238, 228, 218) (247, 100, 67) (247, 127, 99) (235, 216, 182)
(246, 148, 97) (242, 177, 120) (240, 210, 108) (243, 178, 120)
(235, 216, 182) (238, 228, 218) (238, 228, 218) (190, 173, 152)
(238, 228, 218) (189, 172, 152) (189, 173, 152) (190, 173, 152)
Now add a Compare Pixel Color action for each square type including the empty square: Manage Actions -> Add Action Get Coordinates. For each action select the background color of the corresponding square. Name them isEmpty, is2, is4 and so on.

For action is4, select the background color of the square with the number 4.
To identify the square, we compare the color retrieved with the one in reference of all actions isEmpty, is2, is4… The one with the smallest difference is the right square type.
 1from guirecognizer import ActionType, Recognizer
 2
 3recognizer = Recognizer('2048Config.json')
 4topLeft = recognizer.executeCoordinates('topLeft')
 5bottomRight = recognizer.executeCoordinates('bottomRight')
 6gridWidth = 4
 7gridHeight = 4
 8width = (bottomRight[0] - topLeft[0]) / (gridWidth - 1)
 9height = (bottomRight[1] - topLeft[1]) / (gridHeight - 1)
10
11compareActions = ['isEmpty', 'is2', 'is4', 'is8', 'is16', 'is32', 'is64', 'is128']
12squareTypes = ['   _', '   2', '   4', '   8', '  16', '  32', '  64', ' 128']
13
14for y in range(gridHeight):
15line = ''
16for x in range(gridWidth):
17  coord = (round(topLeft[0] + x  * width), round(topLeft[1] + y  * height))
18  color = recognizer.executePixelColor(ActionType.PIXEL_COLOR, coord=coord)
19  squareType = None
20  minDiff = 10000
21  for i in range(len(compareActions)):
22    diff = recognizer.executeComparePixelColor(compareActions[i], pixelColor=color)
23    if diff < minDiff:
24    minDiff = diff
25    squareType = squareTypes[i]
26  line += f'{squareType} '
27print(line)
 2   64   32    4
16    8  128    8
 4    2    2    _
 2    _    _    _
The identified square types are correct. Line 22 shows how to compare the retrieved color with the reference color of the associated action.
Every time we retrieve the color on line 18, the pixel color on screen is retrieved by calling the operating system’s screen API.
It’s inefficient.
Instead, retrieve the borders portion of the screen once using guirecognizer.Recognizer.getBordersImage(),
so the screen API is called only a single time.
Then pass the image as a parameter of recognizer.executeComparePixelColor.
borders = recognizer.getBordersImage()
for y in range(gridHeight):
  line = ''
  for x in range(gridWidth):
    ...
    color = recognizer.executePixelColor(ActionType.PIXEL_COLOR, coord=coord, bordersImage=borders)
    ...
With this approach, execution time drops to about 30ms instead of 500ms.
Estimating the number of health points from a health bar
Let’s take as an example the game Pokémon Ruby. Each Pokémon has health points. In our bot we want to know how much health has our Pokémon.
Let’s use the following screenshot of the game. Our Pokémon health status is on the right. We can read it has 8 health points left. There is also a health bar visually representing how much health it has left.
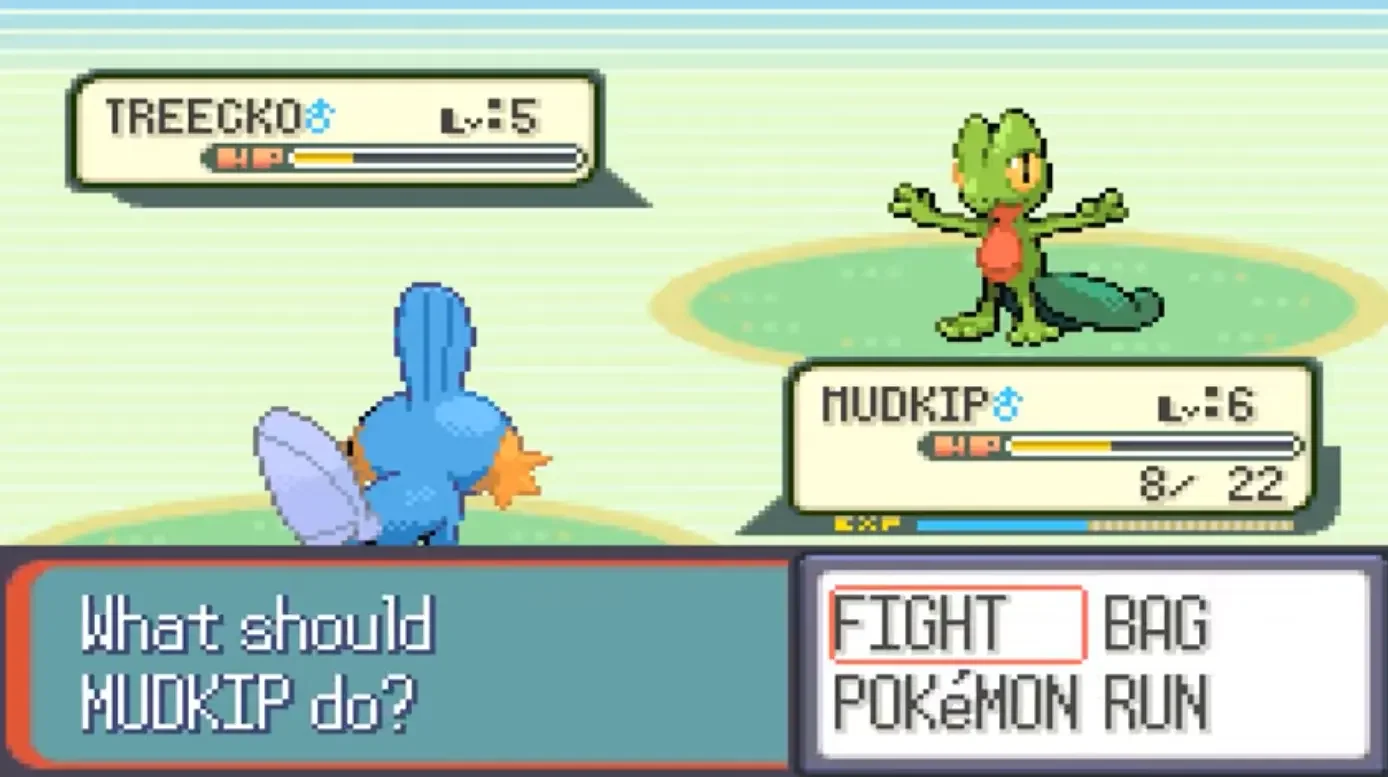
Screenshot of a battle in the game Pokémon. We want to recognize how much health our Pokémon (at the bottom) has left.
We could first try to use an action to recognize the number 8 (API section Number). Here are some drawbacks:
In game interfaces the health points are often written in a very small font and in front of stylized background. As a result, it is sometimes hard for OCRs to retrieve the number. Some preprocessing may drastically improve the performance.
The action may lack reliability because the OCR may recognize a specific number but not another. It may not be possible to test all numbers.
The time it takes for the OCR to execute may be unacceptable. It can take half a second just to retrieve the health points. This can slow down the bot significantly if the action needs to be executed frequently.
Instead of recognizing the number of health points, let’s use the health bar. It assumes the bot does not need the exact number of health points but only an estimation. We can use the average color of the health bar to compute by how much the health bar is filled. Then if we already know the maximum number of health points of our Pokémon, we can estimate the number of health points. If we don’t have the maximum number of health points, maybe the bot only needs the percentage of health points left.
Open the screeenshot in guirecognizerapp. Create a Get Pixel Color action: Manage Actions -> Add Action Get Pixel Color. Name it healthBar. Select a rectangle covering the whole inside of the health bar.
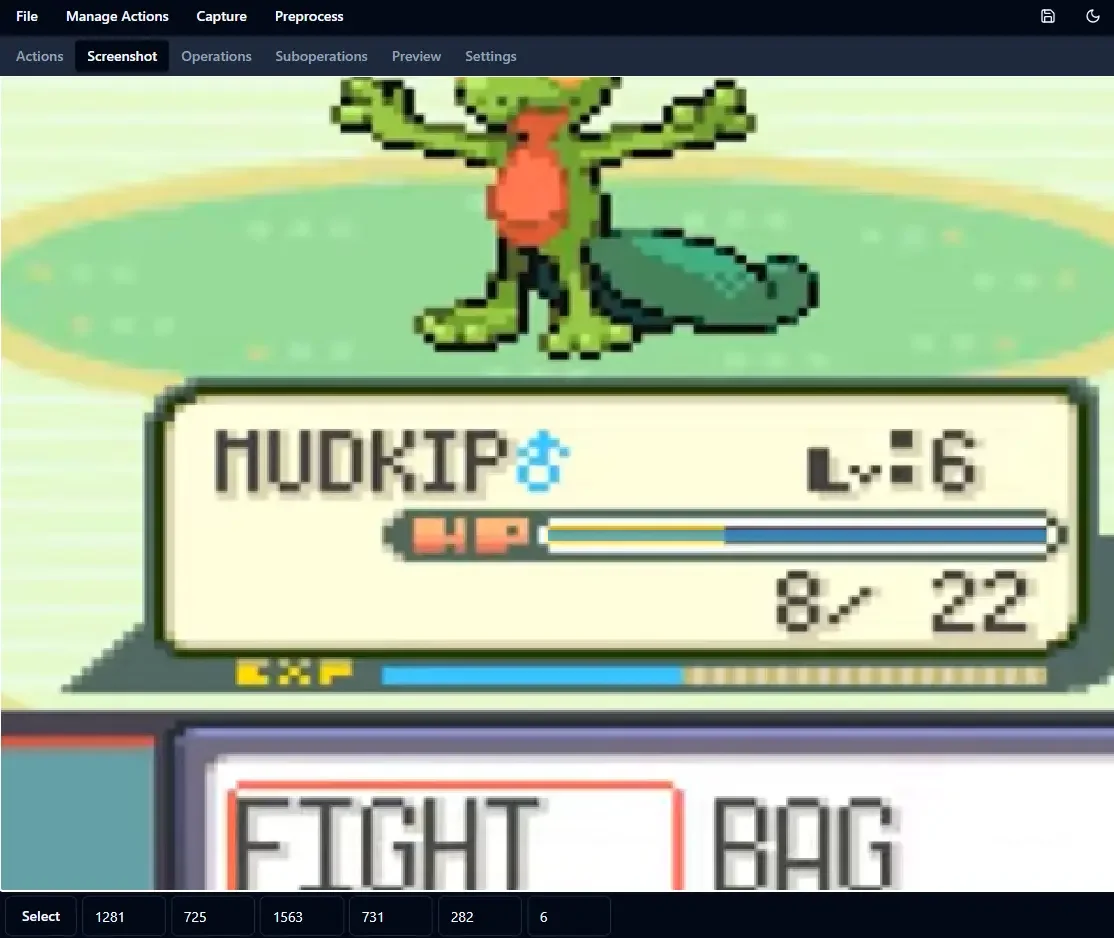
Select the inside of the health bar to get its average color.
To compute the fill percentage of the health bar, we need to process the image first. Create a new operation: Preprocess -> Add Operation. Name it threshold. Click on the edit button of the operation. Then add a suboperation Threshold: Preprocess -> Add Suboperation -> Threshold.
Preview the preprocessing operation in the tab Suboperations by selecting your action healthBar in the dropdown Preview preprocessing operation.
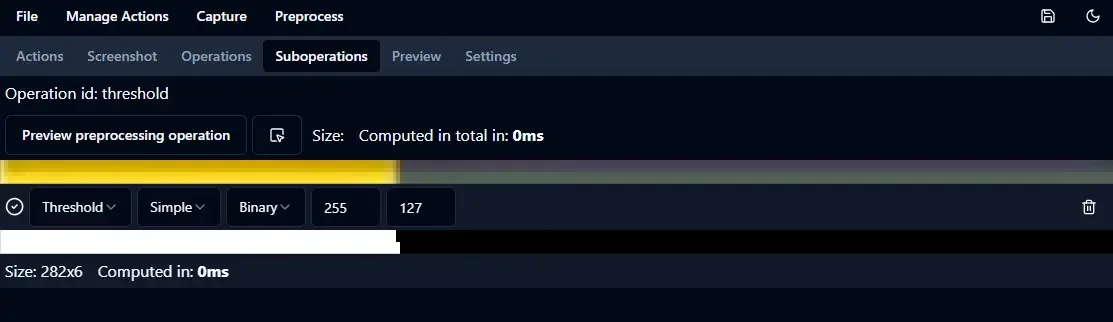
Preview of the operation threshold on the selection of the action healthBar.
The preprocessed image is in black and white. Its average color is a shade of grey that represents by how much the health bar is filled.
Let’s preview the action healthBar (the eye icon in front of the action in the tab Actions). Then select the operation threshold in the dropdown Preprocess.
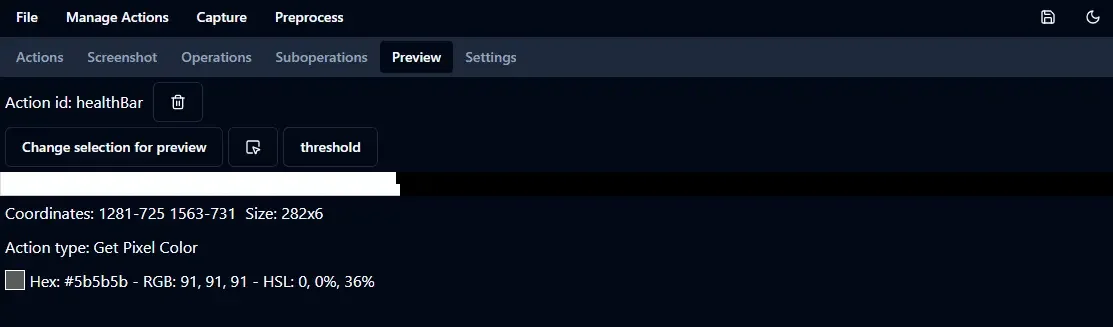
Preview of the action healthBar with the preprocessing operation threshold.
The average color is a shade of grey. Its value is 91. Black value is 0. White value is 255. If the health bar was full, its color would be fully white.
If the health bar was empty, its color would be fully black. So we can compute the fill percentage of the health bar by dividing by 255.
Here the bar is filled at 91 / 255 ≃ 36%. The maximum number of health points is 22 so our estimation of the number of health points
is 22 * 0.36 ≃ 8. Our estimation is exactly right.
To use the action in the bot, save the configuration file healthBarConfig.json in your project folder: File -> Save or Ctrl+S. Here is the bot code.
1from guirecognizer import Recognizer
2
3recognizer = Recognizer('healthBarConfig.json')
4color = recognizer.executePixelColor('healthBar', preprocessing='threshold')
5ratio = color[0] / 255
6maxHp = 22
7hp = round(ratio * maxHp)
8print(f'Ratio: {round(ratio * 100)}%  HP: {hp}')
Ratio: 36% HP: 8